Tuesday 17 May 2016

Multiple runtime permission access in marshmallow version


Change your Minimum sdk version - 23

/** * RUN TIME PERMISSIONS FOR MARSHMALLOW VERSION */
 private int hasExtStoragePermission;
 private int hasReadPhoneStatePermission;
 private List<String> permissions = new ArrayList<String>();
 final static int REQUEST_CODE_SOME_FEATURES_PERMISSIONS=100;

hasExtStoragePermission = checkSelfPermission( Manifest.permission.WRITE_EXTERNAL_STORAGE );
hasReadPhoneStatePermission = checkSelfPermission( Manifest.permission.READ_PHONE_STATE );

if( hasExtStoragePermission != PackageManager.PERMISSION_GRANTED ) {
    permissions.add( Manifest.permission.WRITE_EXTERNAL_STORAGE );
}
if( hasReadPhoneStatePermission != PackageManager.PERMISSION_GRANTED ) {
    permissions.add( Manifest.permission.READ_PHONE_STATE );
}

if( !permissions.isEmpty() ) {
    requestPermissions( permissions.toArray( new String[permissions.size()] ), REQUEST_CODE_SOME_FEATURES_PERMISSIONS );
}


Then override this method in your activity where you want to show run time permission to user- 

@Overridepublic void onRequestPermissionsResult(int requestCode, String[] permissions, int[] grantResults) {
    switch ( requestCode ) {
        case REQUEST_CODE_SOME_FEATURES_PERMISSIONS: {
            for( int i = 0; i < permissions.length; i++ ) {
                if( grantResults[i] == PackageManager.PERMISSION_GRANTED ) {
                    Log.d( "Permissions", "Permission Granted: " + permissions[i] );
                } else if( grantResults[i] == PackageManager.PERMISSION_DENIED ) {
                    Log.d( "Permissions", "Permission Denied: " + permissions[i] );
                }
            }
        }
        break;
        default: {
            super.onRequestPermissionsResult(requestCode, permissions, grantResults);
        }
    }
}

Explaination-

step -1
if (Build.VERSION.SDK_INT >= Build.VERSION_CODES.M) {
    if(checkPermissions()){
        doSomething();
    } else {
        requestPermissions();
    }

} else {
    doSomething();
}
 
Step-2

private boolean checkPermissions() {
    hasExtStoragePermission = ContextCompat.checkSelfPermission(this, Manifest.permission.WRITE_EXTERNAL_STORAGE );
    if( hasExtStoragePermission == PackageManager.PERMISSION_GRANTED ) {
        return true;
    }
    //If permission is not granted returning false    return false;
}


Step-3 

@RequiresApi(api = Build.VERSION_CODES.M)
private void requestPermissions() {
    if( hasExtStoragePermission != PackageManager.PERMISSION_GRANTED ) {
        permissions.add( Manifest.permission.WRITE_EXTERNAL_STORAGE );
    }
    if( !permissions.isEmpty() ) {
        requestPermissions( permissions.toArray( new String[permissions.size()] ), REQUEST_CODE_SOME_FEATURES_PERMISSIONS );
    }
}

Step-4 

@Overridepublic void onRequestPermissionsResult(int requestCode, String[] permissions, int[] grantResults) {
    switch ( requestCode ) {
        case REQUEST_CODE_SOME_FEATURES_PERMISSIONS: {
            for( int i = 0; i < permissions.length; i++ ) {
                if( grantResults[i] == PackageManager.PERMISSION_GRANTED ) {
                    doSomething();
                } else if( grantResults[i] == PackageManager.PERMISSION_DENIED ) {
                    Log.d( "Permissions", "Permission Denied: " + permissions[i] );
                }
            }
        }
        break;
        default: {
            super.onRequestPermissionsResult(requestCode, permissions, grantResults);
        }
    }
}

Wednesday 4 May 2016

Difference between Add and replace fragment


replace removes the existing fragment and adds a new fragment..
but add retains the existing fragments and adds a new fragment that means existing fragment will be active and they wont be in 'paused' state hence when a back button is pressed onCreateView()is not called for the existing fragment(the fragment which was there before new fragment was added).

Tuesday 3 May 2016

Singleton to Instantiate the SQLiteOpenHelper

Declare your database helper as a static instance variable and use the Singleton pattern to guarantee the singleton property. The sample code below should give you a good idea on how to go about designing the DatabaseHelper class correctly.
The static getInstance() method ensures that only one DatabaseHelper will ever exist at any given time. If the sInstance object has not been initialized, one will be created. If one has already been created then it will simply be returned. You should not initialize your helper object using with new DatabaseHelper(context)! Instead, always use DatabaseHelper.getInstance(context), as it guarantees that only one database helper will exist across the entire application’s lifecycle.

public class DatabaseHelper extends SQLiteOpenHelper { 

  private static DatabaseHelper sInstance;

  private static final String DATABASE_NAME = "database_name";
  private static final String DATABASE_TABLE = "table_name";
  private static final int DATABASE_VERSION = 1;

  public static synchronized DatabaseHelper getInstance(Context context) {
     
    // Use the application context, which will ensure that you 
    // don't accidentally leak an Activity's context.
    // See this article for more information: http://bit.ly/6LRzfx
    if (sInstance == null) {
      sInstance = new DatabaseHelper(context.getApplicationContext());
    }
    return sInstance;
  }
    
  /**
   * Constructor should be private to prevent direct instantiation.
   * make call to static method "getInstance()" instead.
   */
  private DatabaseHelper(Context context) {
    super(context, DATABASE_NAME, null, DATABASE_VERSION);
  }
}

Monday 2 May 2016

Application memory leak Memory Analysis Tool in android studio

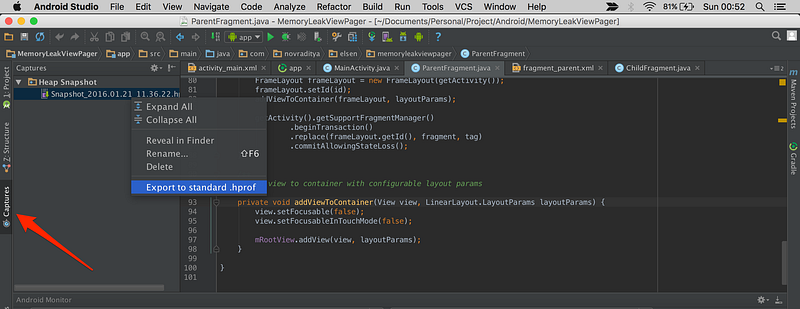
MAT is a useful tool to analyse your memory usage. Before analyse the memory usage, first we need to create the .hprof file from my activities on the app. We can build this .hprof file easily using Android Studio. Here are the steps:
1. Run the test on your app. Do something that potentially can cause memory leak.
2. Initiate GC (Garbage Collector)


3. Dump java heap


4. Open heap snapshot in capture tab on the left side. Then, export the snapshot to standard .hprof.


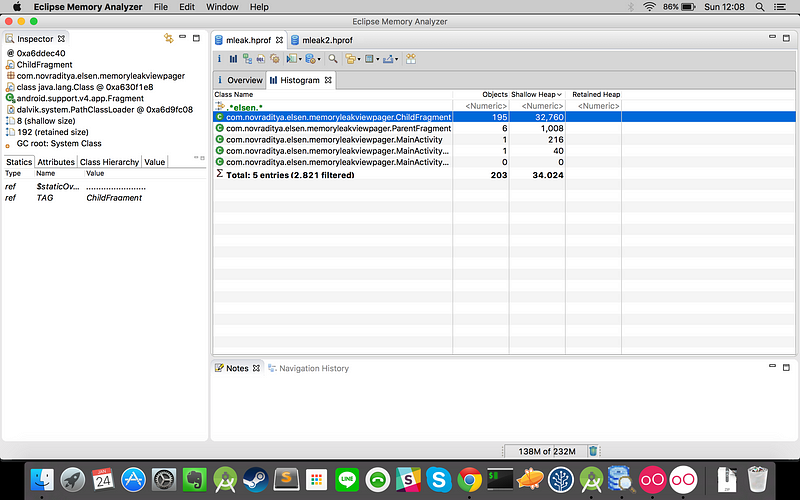
5. That’s it. Now we have the standard .hprof file. Open this file using MAT. Then start analyse. You can find how to analyse your memory usage using MAT here.